Step-by-Step Guide to Installing SSL on Your WordPress Site
In today’s digital landscape, website security is paramount, and one of the most effective ways to ensure the safety of your WordPress site is by implementing an SSL certificate. Not only does SSL (Secure Socket Layer) encryption protect sensitive data exchanged between your site and its visitors, but it also plays a crucial role in boosting your website’s credibility and search engine rankings. If you’re looking to enhance your site’s security and trustworthiness, you’ve come to the right place. In this comprehensive step-by-step guide, we will walk you through the process of installing an SSL certificate on your WordPress site. From selecting the right certificate to performing the installation and ensuring everything is configured correctly, we’ll cover all the essential aspects to make your site secure. Let’s dive in and empower your online presence with SSL encryption!
Table of Contents
- Choosing the Right SSL Certificate for Your WordPress Site
- Preparing Your WordPress Environment for SSL Installation
- Installing SSL via cPanel and Configuring WordPress Settings
- Testing Your SSL Installation and Ensuring Site Functionality
- In Summary
Choosing the Right SSL Certificate for Your WordPress Site
When it comes to securing your WordPress site, selecting the proper SSL certificate is crucial. There are various types available, each catering to different needs and budgets. To help guide your decision, consider the following factors:
- Type of Validation: SSL certificates come in three validation types: Domain Validation (DV), Organization Validation (OV), and Extended Validation (EV). DV certificates are the most basic and fastest to obtain, suitable for personal blogs, while OV and EV certificates provide higher trust levels for businesses.
- Site Type: If your site handles sensitive data, such as e-commerce or user logins, opt for a certificate that offers enhanced security, like OV or EV. For simpler sites, a DV certificate may suffice.
- Future Scaling: Consider your website’s growth. If you plan to expand or add subdomains, a Wildcard SSL or Multi-Domain SSL certificate might be the best option.
To further clarify your options, the following table summarizes key features of the different SSL certificates:
| Certificate Type | Validation Level | Best For | Average Cost |
|---|---|---|---|
| DV | Basic | Personal blogs | $10 – $100/year |
| OV | Medium | Business websites | $50 – $200/year |
| EV | High | Financial institutions | $100 – $500/year |
| Wildcard | Varies | Multiple subdomains | $150 – $600/year |
| Multi-Domain | Varies | Multiple domains | $100 – $800/year |
Preparing Your WordPress Environment for SSL Installation
Before diving into the installation of SSL, it’s crucial to ensure your WordPress environment is ready for this upgrade. Start by performing a backup of your website, including your database and files. This precaution enables you to restore your site should anything go awry during the installation process. It’s also important to check your hosting provider’s guidelines for installing SSL certificates, as many platforms offer automated tools to facilitate the process.
Next, assess the current configuration of your WordPress setup. Consider the following aspects to streamline the SSL installation:
- Update WordPress, Themes, and Plugins: Ensure everything is current to avoid compatibility issues.
- Check for Mixed Content: Utilize tools like SSL Insecure Content Fixer to identify problematic resources that could hinder the transition.
- Review Permanent Links: Make sure your permalink structure is optimized, as this can affect site performance post-installation.
Lastly, here’s a simple table summarizing important checks before installation:
| Task | Status |
|---|---|
| Backup Complete | ✔️ |
| WordPress Updated | ✔️ |
| Insecure Content Identified | ❌ |
| Permalinks Reviewed | ✔️ |
Ensuring these elements are in place will not only make the SSL installation smoother but will also enhance the overall security and reliability of your WordPress site.
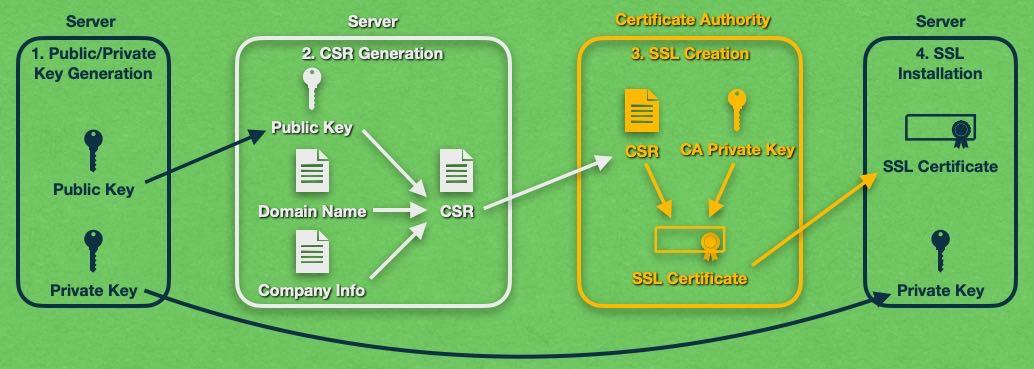
Installing SSL via cPanel and Configuring WordPress Settings
To begin the SSL installation process through cPanel, log in to your cPanel account and navigate to the ‘SSL/TLS’ section. Within this area, you will find an option to manage SSL for your domains. Follow these steps:
- Select the domain for which you want to install the SSL certificate.
- Choose the option to Generate, view, upload, or delete SSL certificates.
- Follow the prompts to generate a CSR (Certificate Signing Request), if it’s required, or upload your existing certificate.
- Once uploaded, navigate to the Manage SSL sites option to install the certificate for your domain.
After successfully installing SSL, it’s crucial to adjust your WordPress settings to ensure your site operates effectively over HTTPS. Log in to your WordPress dashboard and follow these crucial steps:
- Navigate to ‘Settings’ > ‘General’.
- Update the WordPress Address (URL) and Site Address (URL) to start with HTTPS.
- Install and activate a plugin such as Really Simple SSL to assist in managing the redirection and ensuring that all your content loads securely.
- check your pages to confirm they are loading correctly with HTTPS. You may utilize tools like SSL Checker to examine the installation and identify any mixed content issues.
Testing Your SSL Installation and Ensuring Site Functionality
After successfully installing your SSL certificate, it’s crucial to verify that everything is functioning as expected. Start by checking your website for any mixed content issues, which occur when both HTTP and HTTPS resources are loaded on the same page. You can use tools like Why No Padlock or the browser’s developer tools to identify these issues. To resolve any mixed content problems, you may need to update the URLs of various resources such as images, stylesheets, and scripts to their HTTPS equivalents. Here’s a checklist to follow:
- Check browser address bar: Ensure the padlock icon is displayed.
- Use SSL testing tools: Utilize sites like SSL Labs to analyze your implementation.
- Inspect site pages: Look for warnings or errors that may indicate a problem.
Once you ensure that your site is secure, it’s time to confirm that all functionalities are operating smoothly. This includes testing key features such as forms, shopping carts, and any API integrations you might be using. Consider using an automated testing tool or manually navigate your site to check for potential disruptions caused by the SSL installation. Below is a simple table to summarize essential functions to verify:
| Functionality | Test Method |
|---|---|
| Contact Forms | Submit a test form and check for responses. |
| Shopping Cart | Add items and process a dummy checkout. |
| Content Loading | Access different site pages and monitor load times. |
In Summary
Conclusion
Congratulations! You’ve successfully completed the step-by-step process of installing SSL on your WordPress site. By securing your site with an SSL certificate, you not only enhance your site’s security but also build trust with your visitors and improve your SEO rankings.
Remember that maintaining your SSL certificate is just as crucial as installation. Keep an eye on its expiration date, renew it timely, and ensure that your website is always serving traffic securely. With a secure connection in place, you’re not just protecting your data; you’re fostering a safer online environment for your users.
If you have any questions or run into any challenges along the way, don’t hesitate to reach out to the WordPress community or consult your hosting provider for assistance. And as always, stay informed about the latest best practices in website security.
Thank you for following along with our guide. Happy blogging, and here’s to a more secure WordPress journey ahead!